Built-in keyboard keys malfunction is one problem that most laptop users face at some point in time and it is quite annoying. In some cases, one or more keys get automatically pressed. There are different reasons for it - Driver issue or dirt under the keys being the most common.
How to Solve this?
1. Uninstall and reinstall the driver
The first thing you can try is by uninstalling the Keyboard driver.
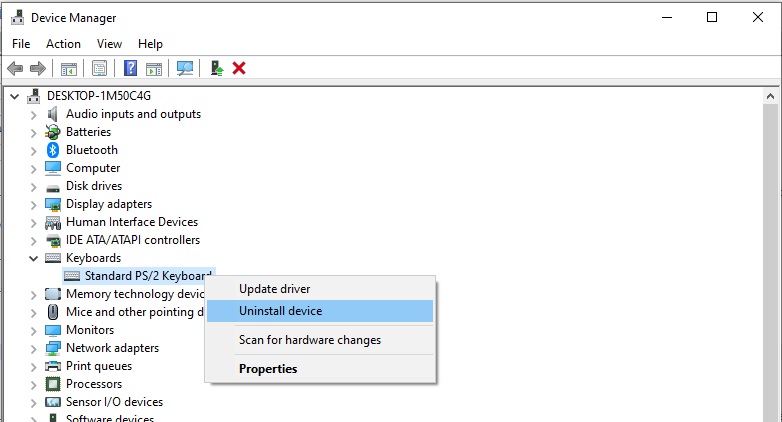
	1. Press Windows key + R, then type in devmgmt.msc.
	or right-click on the Windows logo in the taskbar and choose `Device Manager`
	2. Expand the Keyboard and right click and uninstall the keyboard driver.
	3. Reboot the system.
 Once you reboot the system, the keyboard driver gets automatically installed and in most cases, this should solve the problem.
2. Clean the malfunctioning key
Another issue due to which the key malfunctioning could be because of any dirt or foreign particles under the keyboard. In such cases, you need to remove the key and clean it to fix the issue. Based on your laptop make, you can search for videos on how to remove and clean the keys from the built-in keyboard. I suggest taking help from any professional if you are finding it difficult to do this task.
3. Disable the specific key form keyboard using 'Simple Disable Key'
If options 1 and 2 didn’t solve your issue, this is the workaround. Using this tool, we can disable the specific key causing the issue.
- Download and install Simple Disable Key
- Launch Simple Disable Key
- Choose the
selectbutton right of the key field. - Select the key you would like to disable and press the
add keybutton - If you want to disable the key only for specific programs choose that or else proceed with always.
The Key is disabled. Now, you can minimize or exit the tool. To make sure that the program runs on startup, select Option > Run on Startup .
You can also enable all the disabled keys by Tools > Enable all keys.


Start the conversation